


joshmrallen
|
Complete Flatiron School Prework by...
Star this Commitment
Day 6 of 6
joshmrallen commits to:
Work on Flatiron School Prework for at least 8 hours a day, childcare permitting (sometimes I need to do stuff for the baby).
6
0
No more reports due
|
My Commitment Journal
 joshmrallen
March 8, 2020, 8:31 PM
|
|
|
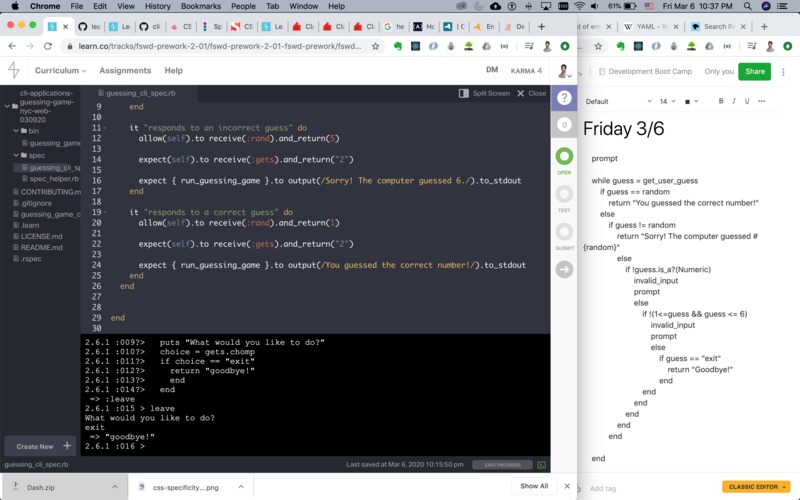
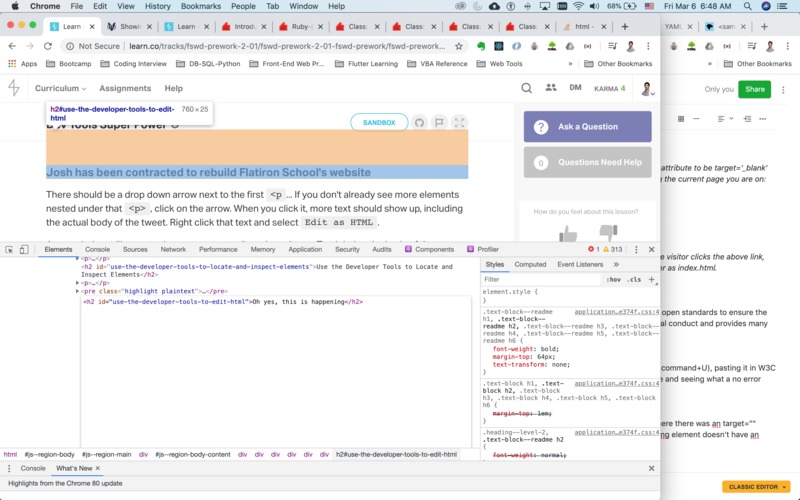
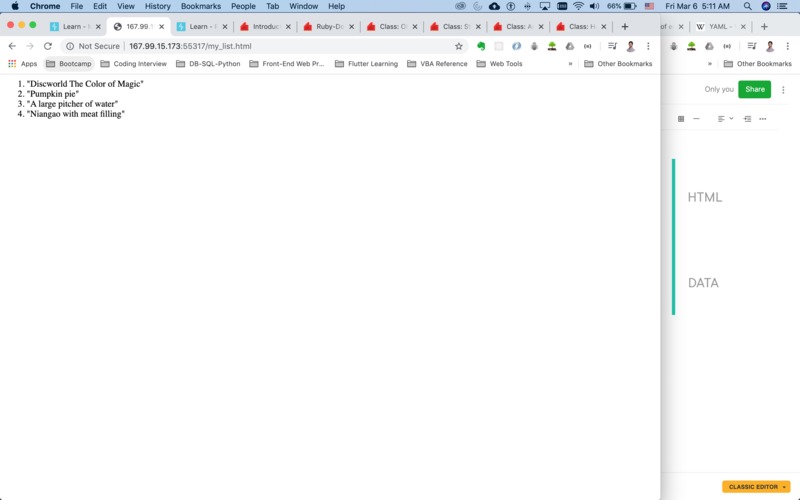
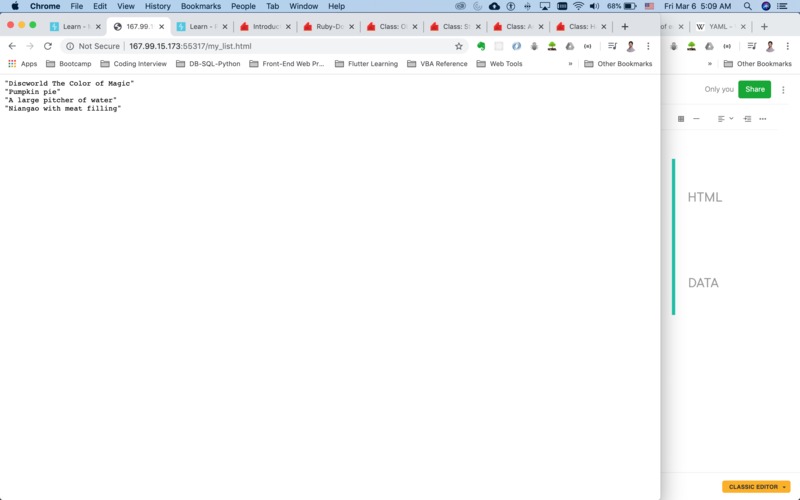
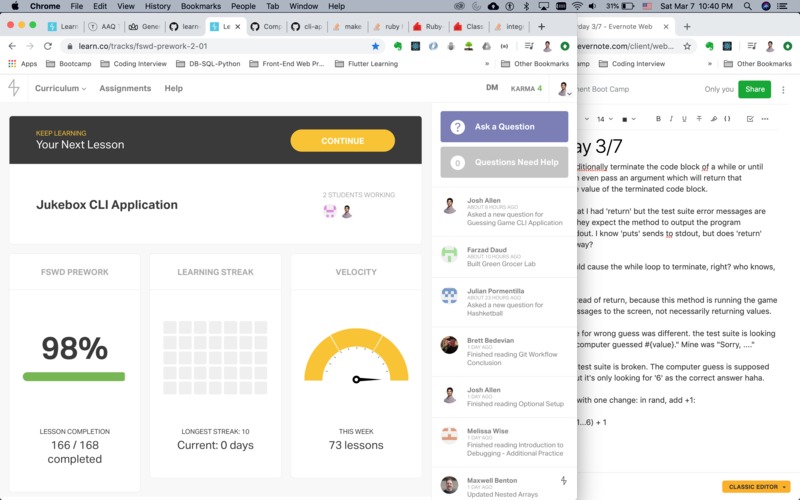
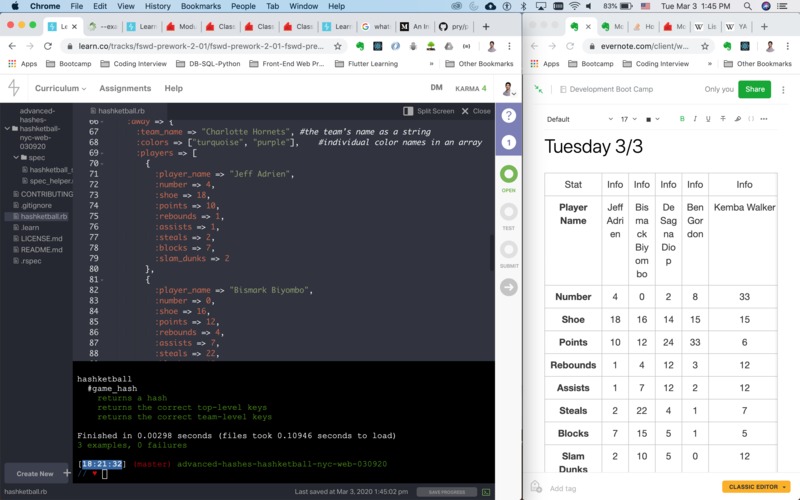
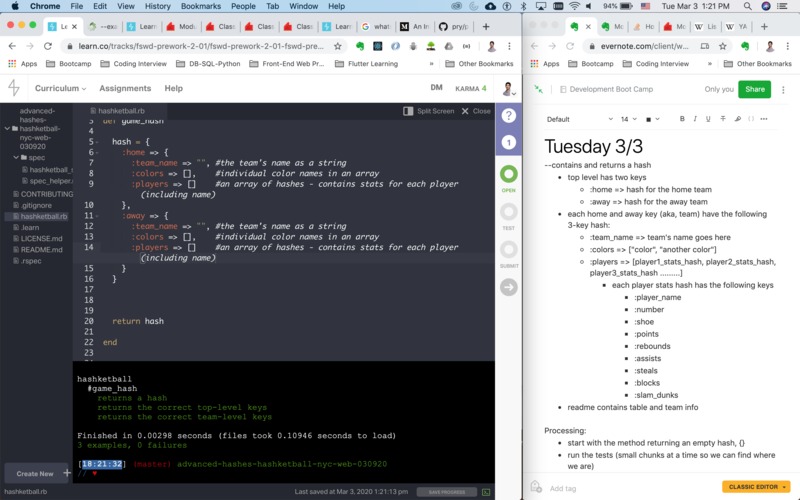
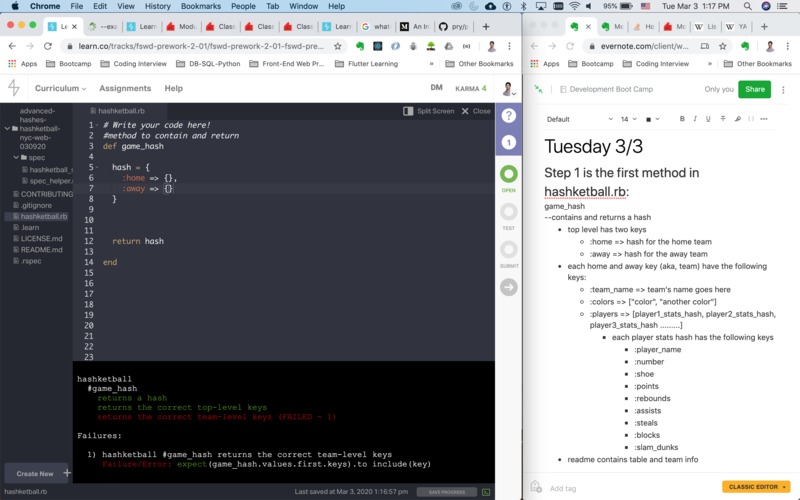
Just adding Screenshots from Friday night to complete this. The percentage is an acceptable pass percentage. One of the labs didn't have rspec so it doesn't show as being completed/submitted even though it was. One of the last labs, the CLI apps, I completed yesterday after chatting with a coach and finding out there was some sort of discrepency with the rspec test suite, so I had to add plus 1 to the rand method to get the test to pass. Thanks Ako for the support! |
|
|
|
|


|
joshmrallen
March 7, 2020, 12:43 PM
|
|
| Whoops, hit complete on this last night. I’ll call it done. Anyways, the ref hasn’t responded. Stay tuned for a new commit for this boot camp. I’ll do weekly reporting but with daily updates. | |
|
joshmrallen
March 6, 2020, 6:15 PM
|
|
|
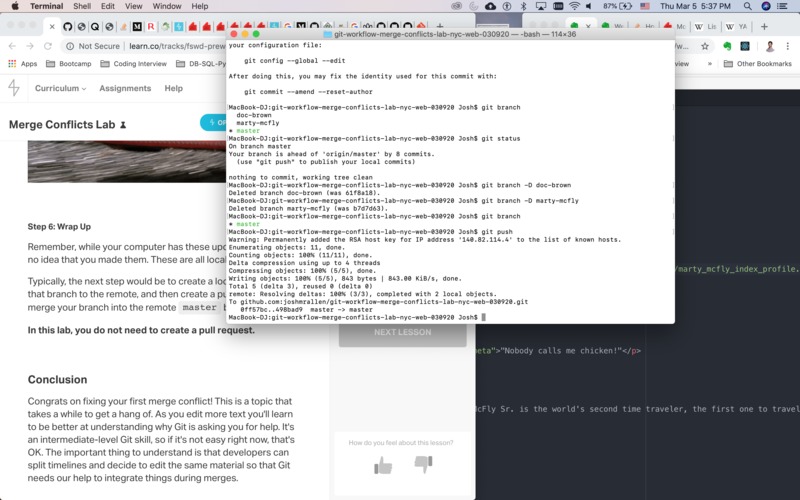
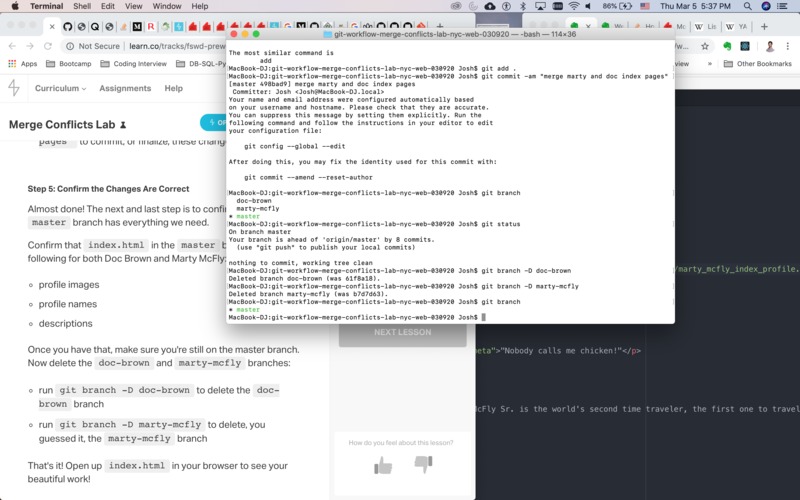
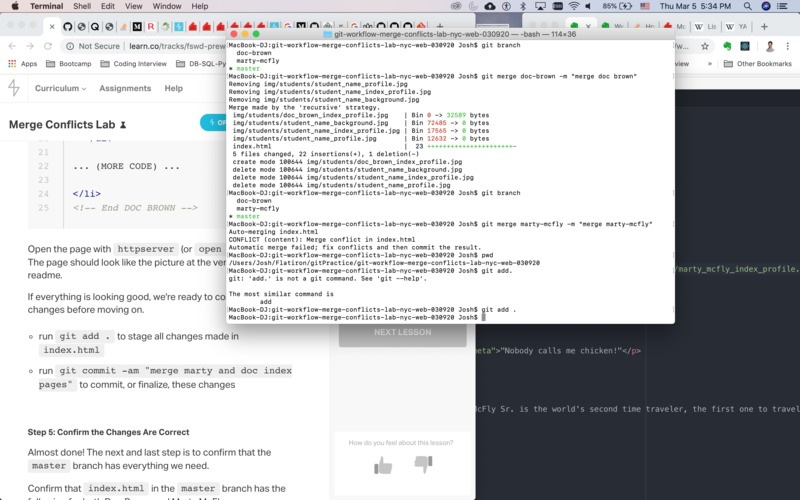
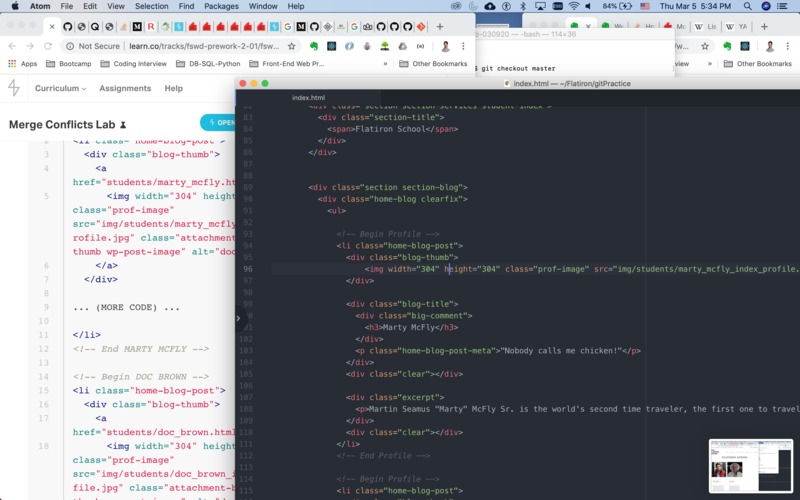
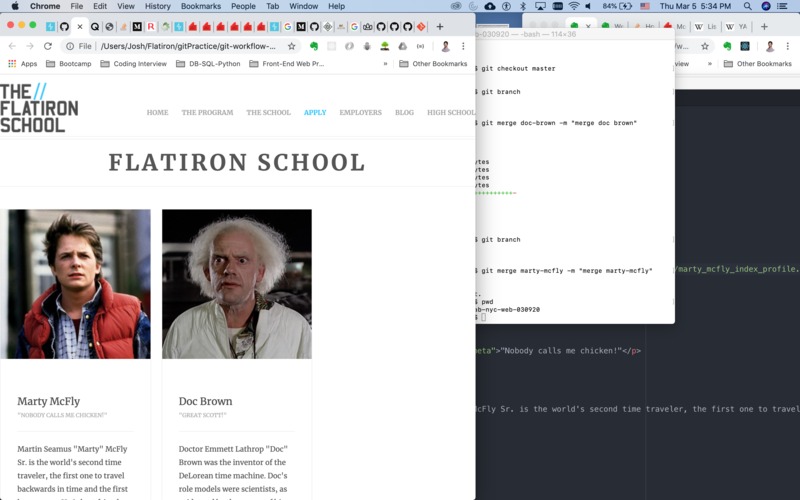
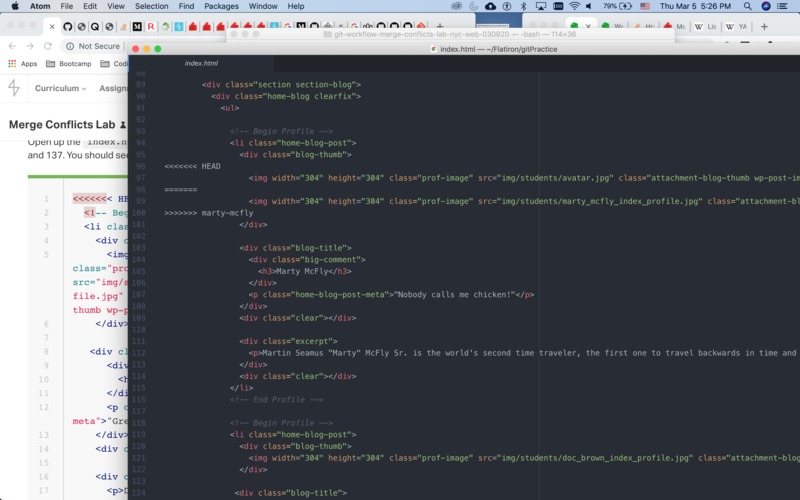
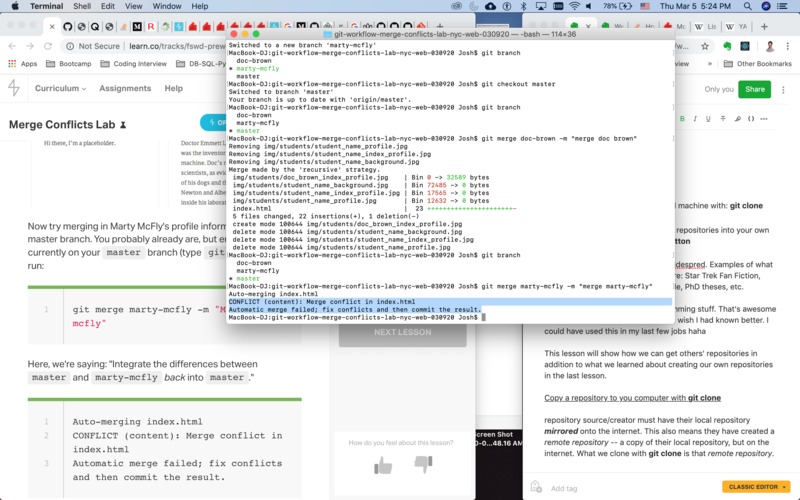
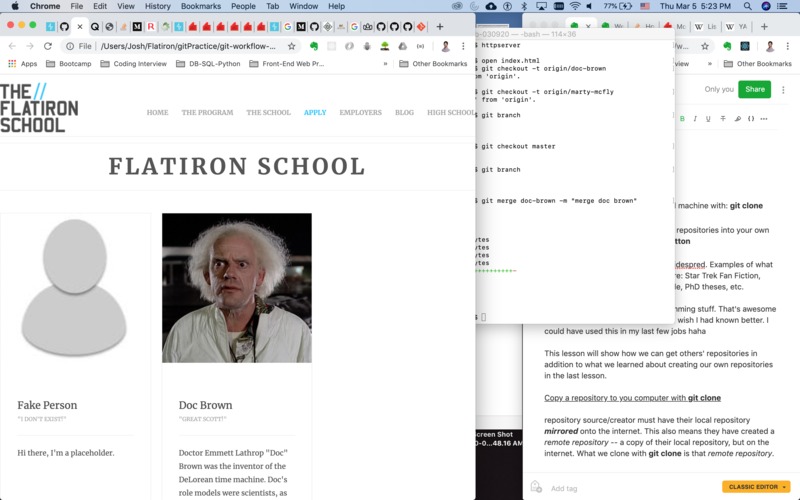
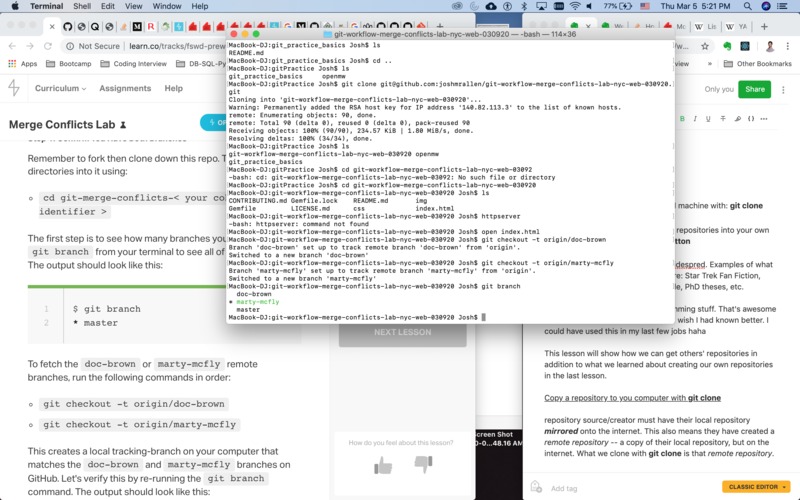
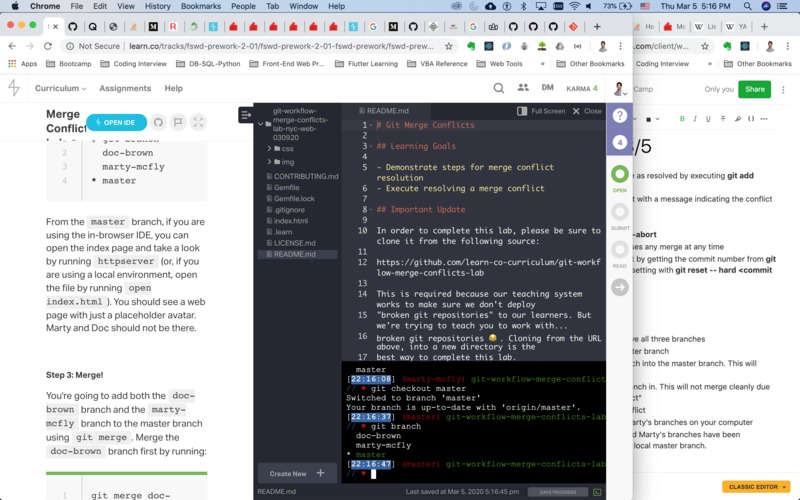
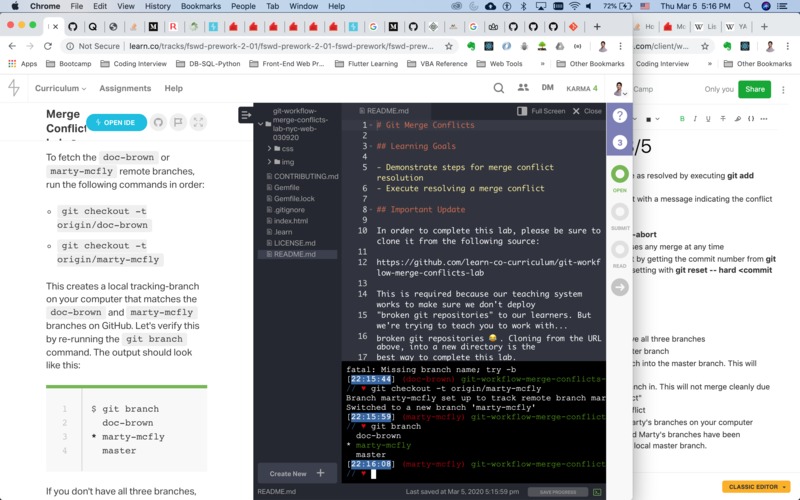
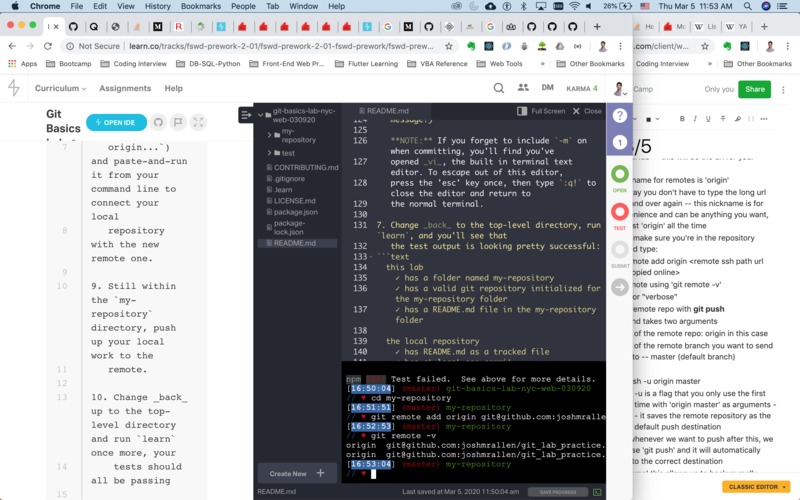
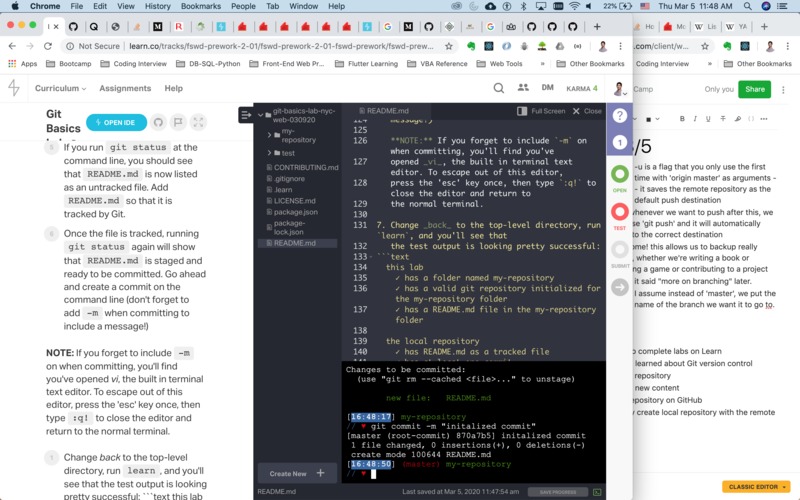
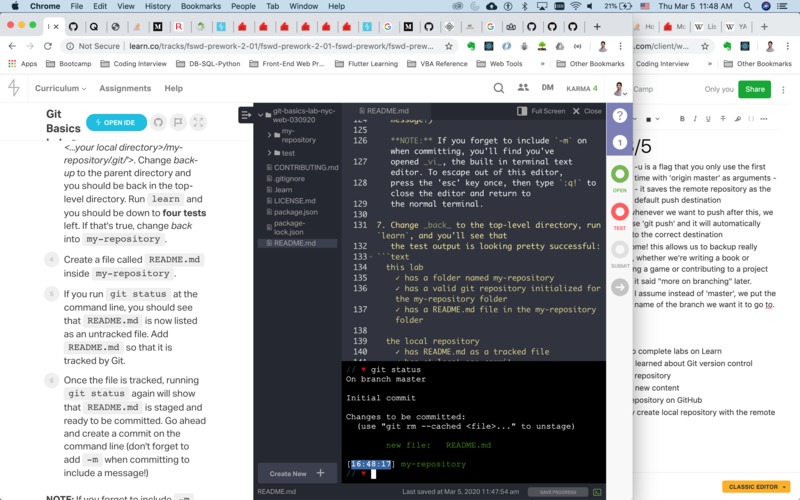
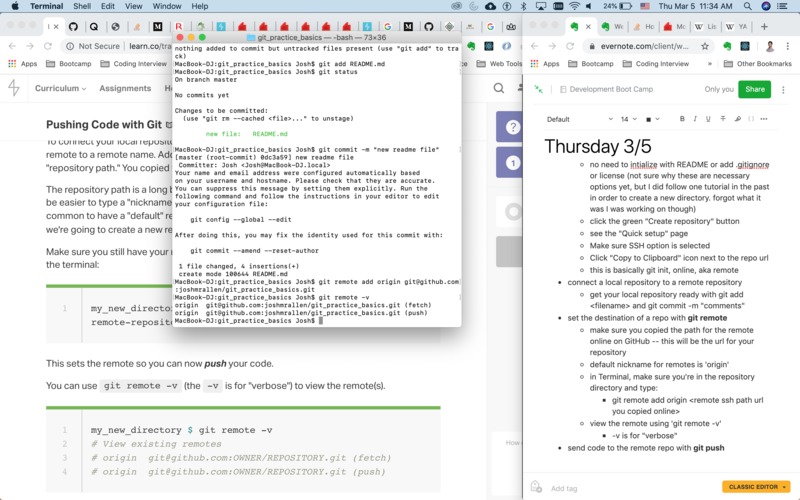
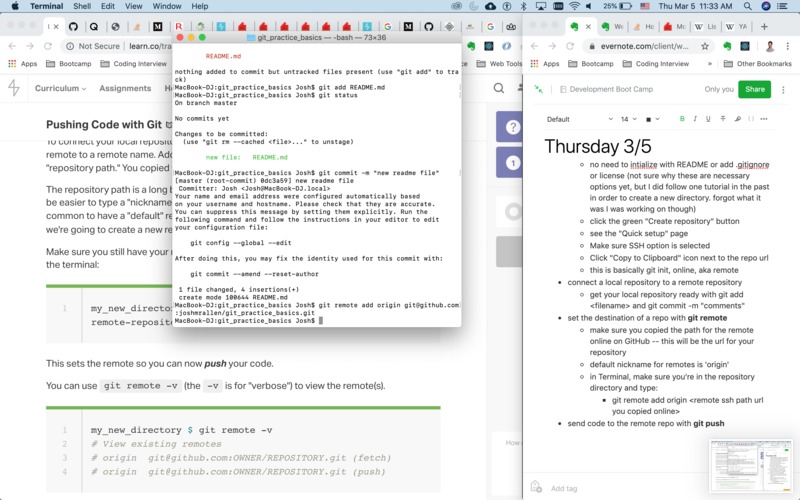
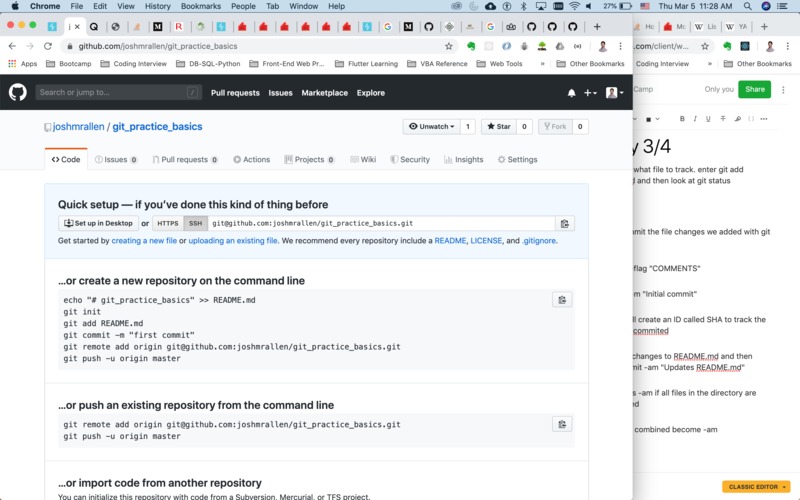
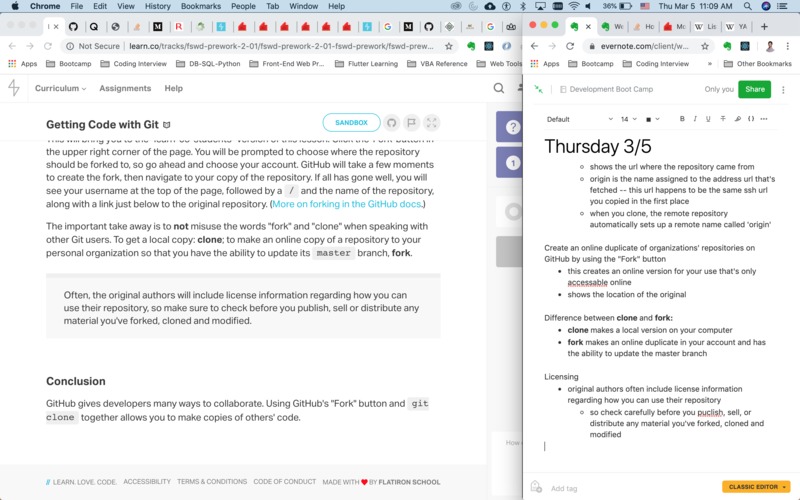
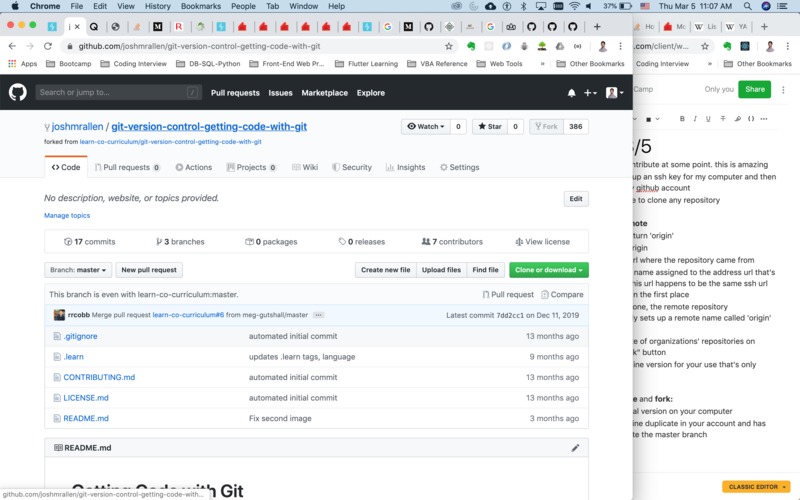
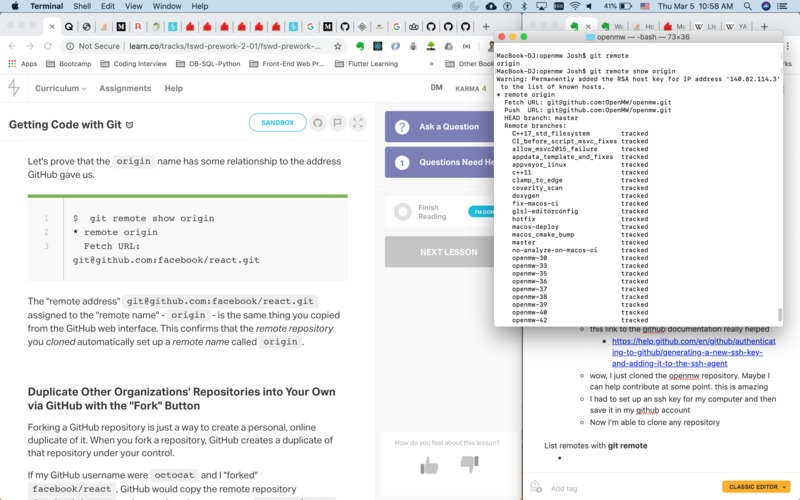
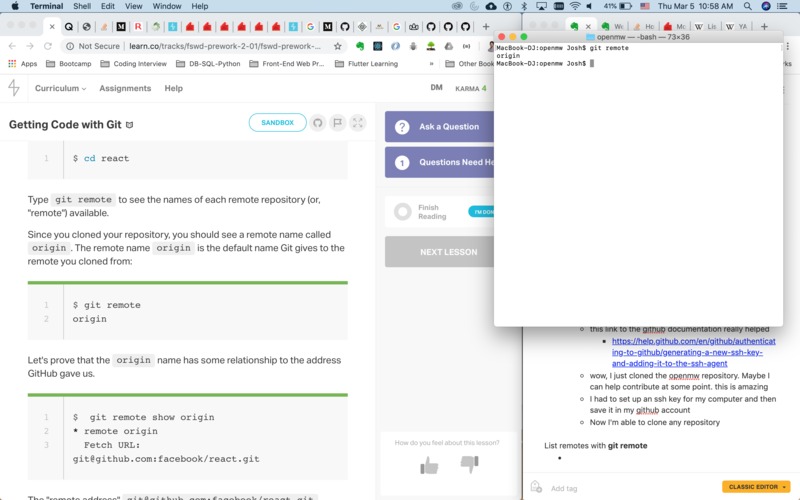
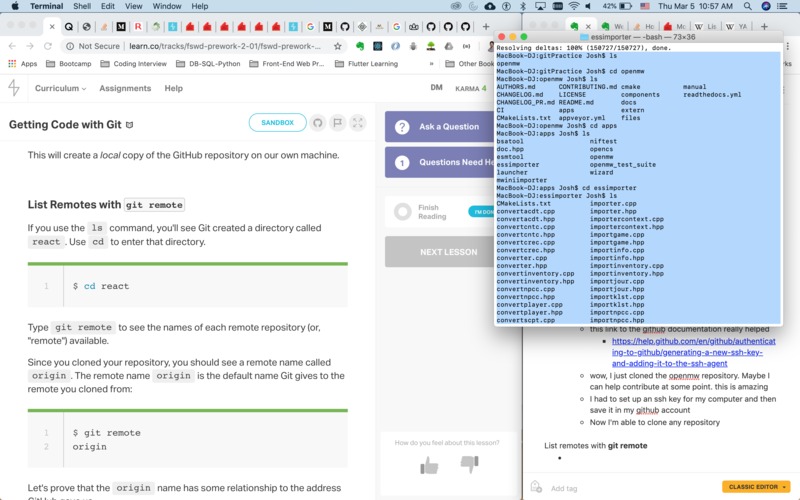
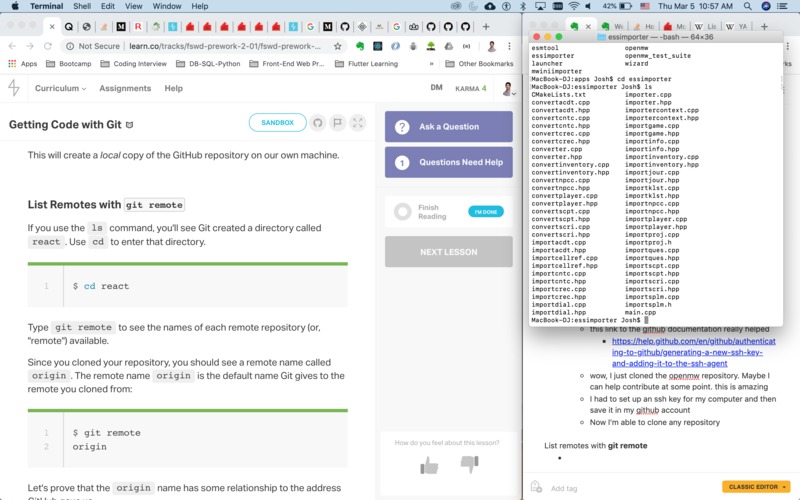
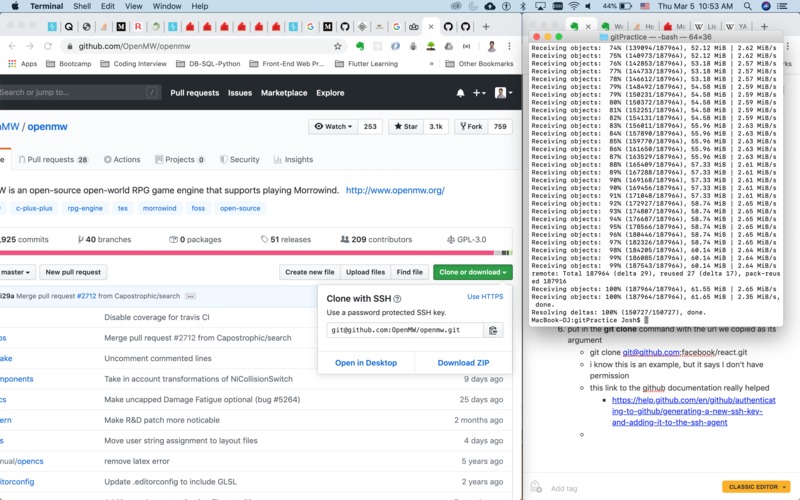
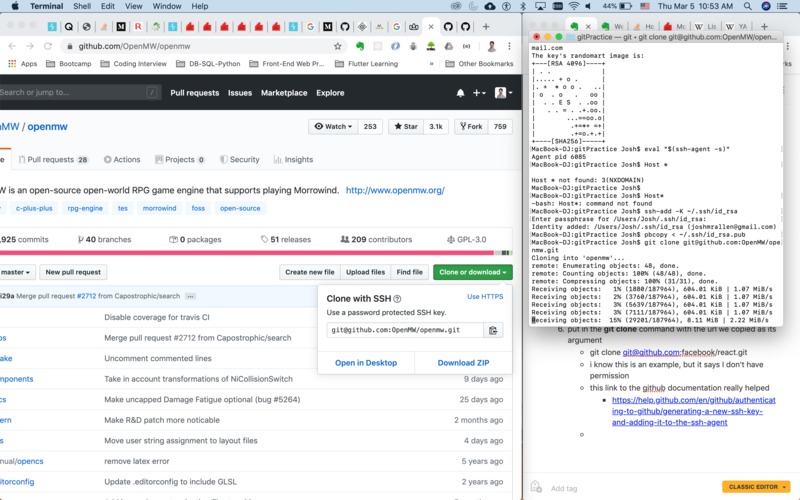
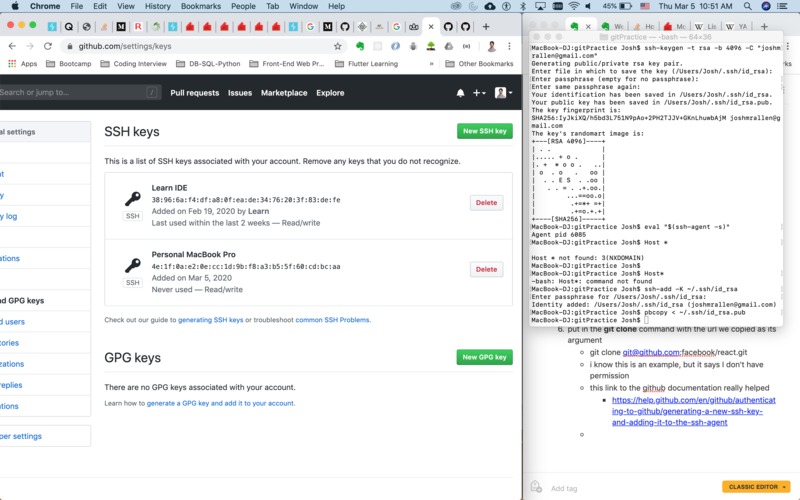
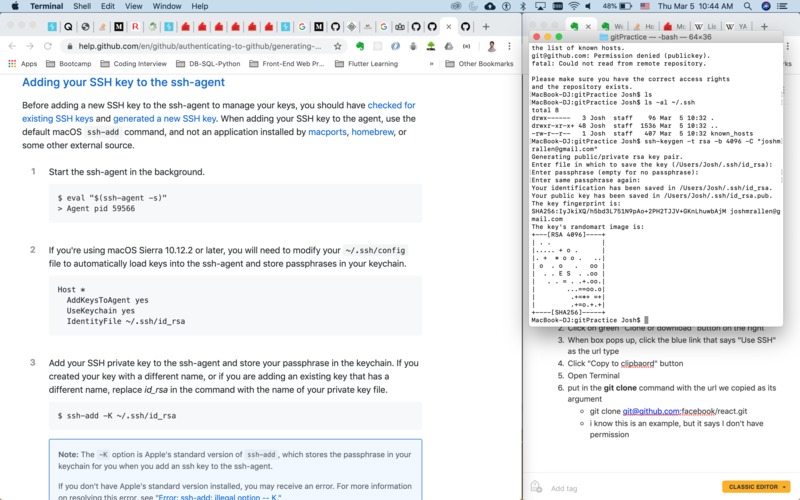
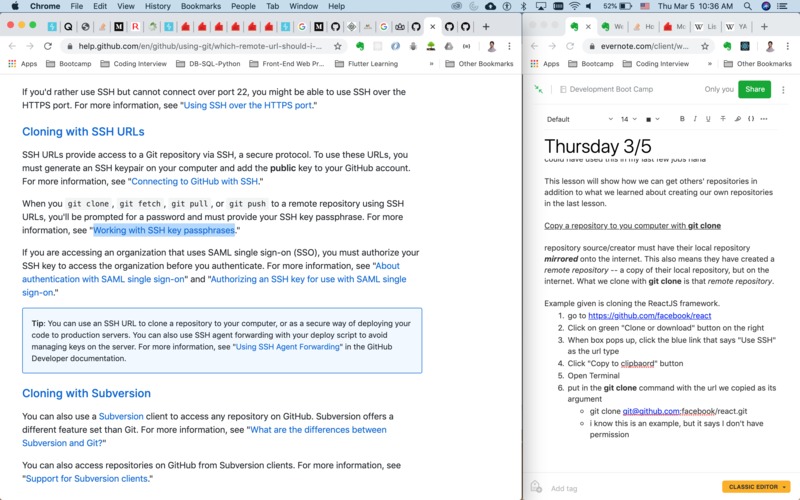
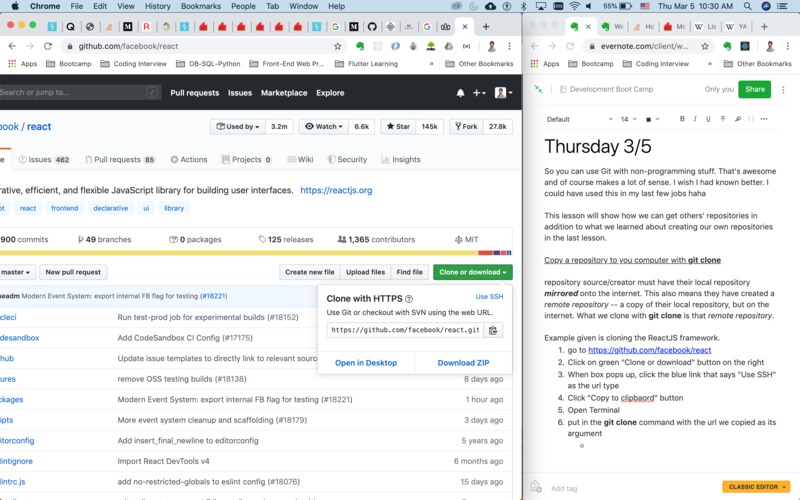
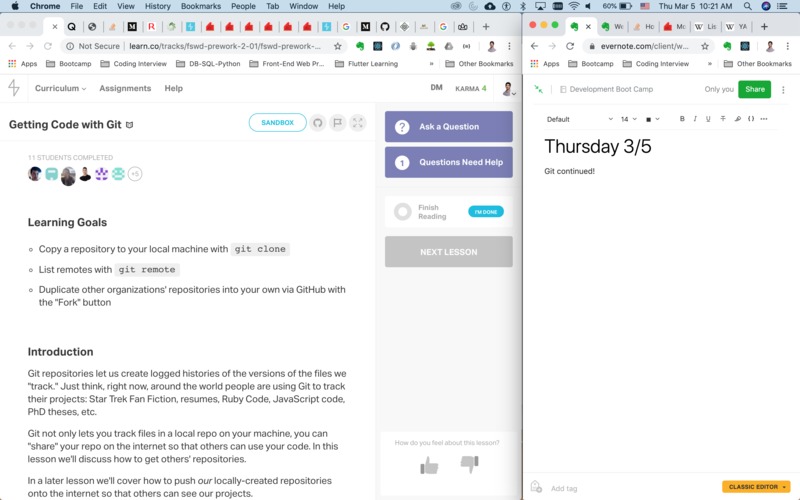
Notes/Report from Thursday 3/5 Git continued! Goals: * copy a repository to your local machine with: git clone * list remotes with git remote * duplicate other ogranizations' repositories into your own via GitHub with the "Fork" button Oh wow, I didn't realize Git was so widespred. Examples of what people use Git to track versions of are: Star Trek Fan Fiction, resumes, Ruby Code, JavaScript code, PhD theses, etc. So you can use Git with non-programming stuff. That's awesome and of course makes a lot of sense. I wish I had known better. I could have used this in my last few jobs haha This lesson will show how we can get others' repositories in addition to what we learned about creating our own repositories in the last lesson. Copy a repository to you computer with git clone repository source/creator must have their local repository mirrored onto the internet. This also means they have created a remote repository -- a copy of their local repository, but on the internet. What we clone with git clone is that remote repository. Example given is cloning the ReactJS framework -- used openmw repository instead 1. go to https://github.com/facebook/react 2. Click on green "Clone or download" button on the right 3. When box pops up, click the blue link that says "Use SSH" as the url type 4. Click "Copy to clipbaord" button 5. Open Terminal 6. put in the git clone command with the url we copied as its argument * git clone [email protected]:facebook/react.git * i know this is an example, but it says I don't have permission * this link to the github documentation really helped * https://help.github.com/en/github/authenticating-to-github/generating-a-new-ssh-key-and-adding-it-to-the-ssh-agent * wow, I just cloned the openmw repository. Maybe I can help contribute at some point. this is amazing * I had to set up an ssh key for my computer and then save it in my github account * Now I'm able to clone any repository List remotes with git remote * git remote - will return 'origin' * git remote show origin * shows the url where the repository came from origin is the name assigned to the address url that's fetched -- this url happens to be the same ssh url you copied in the first place * when you clone, the remote repository automatically sets up a remote name called 'origin' Create an online duplicate of organizations' repositories on GitHub by using the "Fork" button * this creates an online version for your use that's only accessable online * shows the location of the original Difference between clone and fork: * clone makes a local version on your computer * fork makes an online duplicate in your account and has the ability to update the master branch Licensing * original authors often include license information regarding how you can use their repository * so check carefully before you puclish, sell, or distribute any material you've forked, cloned and modified Pushing Code with Git * create a remote repository on GitHub * go to github.com/new * enter name * no need to intialize with README or add .gitignore or license (not sure why these are necessary options yet, but I did follow one tutorial in the past in order to create a new directory. forgot what it was I was working on though) * click the green "Create repository" button * see the "Quick setup" page * Make sure SSH option is selected * Click "Copy to Clipboard" icon next to the repo url * this is basically git init, online, aka remote * connect a local repository to a remote repository * get your local repository ready with git add <filename> and git commit -m "comments" * set the destination of a repo with git remote * make sure you copied the path for the remote online on GitHub -- this will be the url for your repository * default nickname for remotes is 'origin' * this way you don't have to type the long url over and over again -- this nickname is for convenience and can be anything you want, not just 'origin' all the time * in Terminal, make sure you're in the repository directory and type: * git remote add origin <remote ssh path url you copied online> * view the remote using 'git remote -v' * -v is for "verbose" * send code to the remote repo with git push * this command takes two arguments * name of the remote repo: origin in this case * name of the remote branch you want to send code to -- master (default branch) * in Terminal * git push -u origin master * -u is a flag that you only use the first time with 'origin master' as arguments -- it saves the remote repository as the default push destination * now whenever we want to push after this, we just use 'git push' and it will automatically send to the correct destination * awesome! this allows us to backup really easily, whether we're writing a book or creating a game or contributing to a project * it said "more on branching" later. * I assume instead of 'master', we put the name of the branch we want it to go to. Git Basics Lab! * Understand how to complete labs on Learn * Apply what you've learned about Git version control * Initialize a new Git repository * Stage and commit new content * Create a remote repository on GitHub * Connect the newly create local repository with the remote on GitHub Done! More practice basically. Getting the hang of using git, creating local repositories, remote one, and connecting them and pushing, and basically enjoying the power of GitHub. Amazing. Now I can contribute to openmw! But I think it might be in C++, which I only kind of know haha This next section will talk about branching and conflicts: Git Workflow Understanding Branches * What's a git branch? * a version you "branch" off of the master and work on separetely without affecting the "parent" branch * command: git branch will show all local branches * local branch * branch that only we (the local user) can see and exists only on our computer * git branch will show all local branches * remote branch * branch stored in a remote repository hosted on a server or service like GitHub * git branch -a * shows all the remote branches that git knows about * output of this command will be all the branch names that start with 'remotes/' * remote tracking branches * local copy of a remote branch * gets created when you push to a remote repository * allows you to sync or update by using git fetch * local tracking branches * a local branch that is tracking another local branch * most often, the local branch is tracking a remote tracking branch (which is tracking a remote branch) * explanation: * if a project collaborator has a branch that you want to work on too, they push their local branch to the repository as a branch -- let's call it my-friends-branch * Back at your own computer, open terminal and run the command: git fetch * this will refresh information from the remote repository in your clone. * this will also tell you that there's a new remote branch available (that your friend made), called origin/my-friends-branch * In Terminal: run the command, git checkout origin/my-friends-branch which will: 1. establish a remote tracking branch called: remotes/origin/my-friends-branch that points to origin/my-friends-branch 2. establish a local tracking branch, my-friends-branch, that tracks remotes/origin/my-friends-branch 3. put you on the local tracking branch, my-friends-branch * Now, when you make changes to the local tracking branch (my-friends-branch) and git push your changes, git will send your change to the remote repository so that your collaborators can get your change and build on it. * Once ready, your team can merge my-friends-branch to the master. Branching * Create a branch * git branch new-branch-name * if we don't specify a new name, it will list the branches that exist (master and any others that exist) * doing this will show an asterisk, *, next to master * this indicates which branch we're on * git checkout new-branch-name * this will put you "on" the branch you specify (new-branch-name in this case) * run git branch to confirm you've "moved" * git checkout -b new-branch-name * create a new branch and move onto that branch in a single command. (-b flag) * git checkout other-branch-name * move to any branch we specify * git checkout - * moves to the previous branch we were on (dash '-' is important here) * Add and commit changes * git log * shows a log of commits with id, branch, author, date * git status * most often used command - shows you what changes have been staged or added to commit * git add -p * review changes in chunks * git will guide you through each "chunk" and confirm whether to stage or not to stage the chunk * git add file-name * use if we know we want all the changes in the specified file, not individual chunks * git add . * this is 'add' and a dot '.' * use for all the changes in all the files in our current directory * git add images/. * this is the folder name, plus forward slash /, plus dot '.' * stages all the changes to all the files in a specified sub-directory * in this example, the subdirectory is 'images' * Careful with the dot * easy to accidentally commit something we didn't mean to * Developers say "commit small, commit often" * git commit -m "message" * -m is for message * limit to 50 characters * explain briefly what's changed * commits everything that's been staged for the current branch * no flag will open your system's editor (pico in my case) so you can log more information for more significant commits (changes, motivations, bug report URLS, and more) * by default, git will reach for the 'vim' editor * you can configure Git to use the Atom editor * git config --global core.editor "atom --wait" * Push a branch * just like we covered in the previous lesson: * git push -u origin new-branch-name * first time only when pushing the branch * after this, for this branch, you just have to use git push (-u saves origin new-branch-name) realized I can look up git commands easily by referencing them in the terminal with git man And also here: https://git-scm.com/docs/user-manual.html Remote * Get branch updates from remote * git fetch remote-name * Merge branches * git merge other-branch-name * when you want to merge another branch with the one you're currently working on * merge a branch to the master branch: * git checkout master * moves you back to master branch * git merge other-branch * merges other-branch with the branch you're currently on (master in this case) * Delete branches * git branch -d branch-name * -d stands for --delete * deletes the local branch only if you have already pushed and merged it with your remote branches * specify the branch name * git branch -D branch-name * -D stands for --delete --force * deletes the branch regardless of its push and merge status. * be careful with this one * git push <remote_name (most likely origin)> --delete <branch-name> * deletes a remote tracking branch * git branch -a to see all remaining remotes * Fetch and update the local branch in one step * original steps were to git fetch origin, then git merge origin/tracking-branch-name * git pull origin/tracking-branch-name * does this all with the same command * have to be on our local tracking branch * or just git pull if you're already 'on' the local tracking branch * git will assume you mean "the branch of the same name" at origin example of merge: $ git merge other-branch $ git merge origin/idea-my-friend-had $ git merge my-startup/time-travel-engine git-diff commit1 commit2 copy the first 7 digits of each commit id this will show us the difference between previous commits and current work git reset use when you undo a commit that you have not pushed yet git reset --soft HEAD-1 undoes the last commit git reset --soft HEAD-3 undoes last 3 commits number indicates the number of commits we want to go back by "The --soft tag keeps the changes we've made since last commit in our working state so that we can fix, add to or remove them manually. If we know we want to clear those changes entirely, we can use the --hard flag instead. Check the documentation to see all the ways to customize your command." git checkout . dot '.' will clear unwanted changes e.g., if you reset when you didn't mean to, type git checkout . to get back to the state before that git reset was run or a specific file (not a branch name): git checkout filename.html this will wipe all changes to the file and revert it to the last committed state, but keep all the other changes we made in our working state. Merge Conflicts * identify * merge conflicts happen when competing changes are made to the same line of a file * or when one person edits a file and another person deletes the same file * open the file and you'll see: * ========= * this separates the two conflicting changes * <<<<< content >>>>>>> * edit the content within these angle brackets * resolve * mark the file as resolved by executing git add filename * then commit with a message indicating the conflict resolution * revert * git merge --abort * reverses any merge at any time * always reset by getting the commit number from git log, then resetting with git reset -- hard <commit number> Merge Conflicts Lab 1. Make sure you have all three branches 2. Switch to the master branch 3. Merge Doc's branch into the master branch. This will merge "cleanly" 4. Merge Marty's branch in. This will not merge cleanly due to a "merge conflict" 5. Fix the merge conflict 6. Delete Doc and Marty's branches on your computer 7. Verify that Doc and Marty's branches have been integrated to your local master branch. |
|
|
|
|


|
joshmrallen
March 5, 2020, 3:13 PM
|
|
|
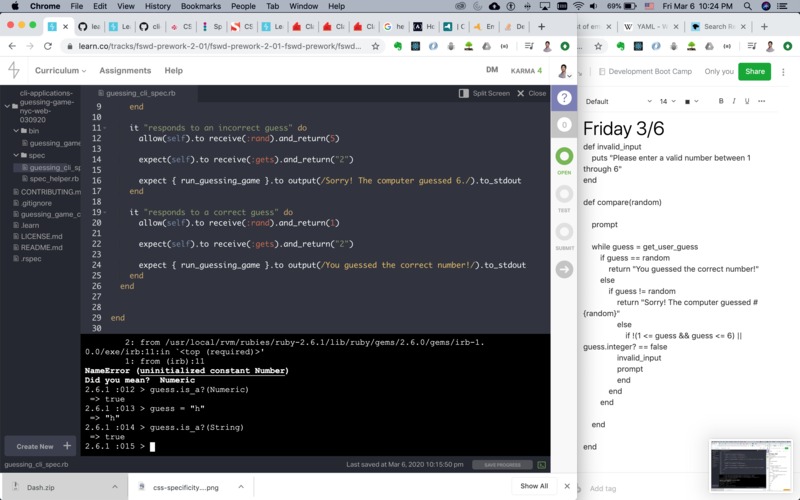
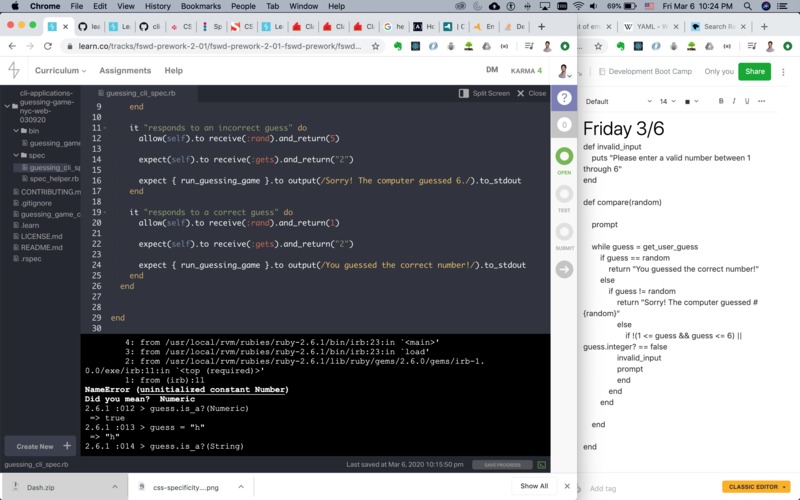
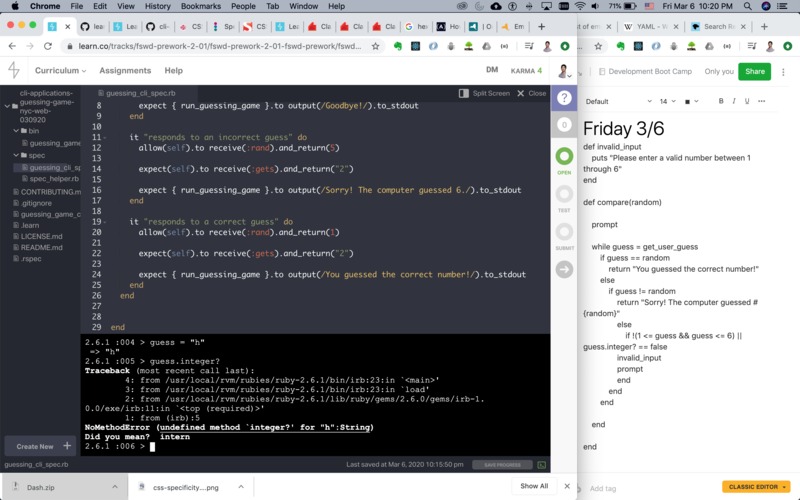
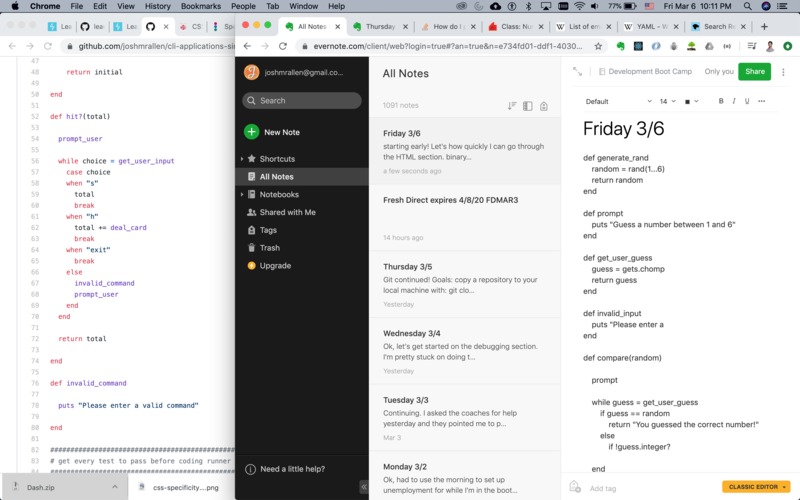
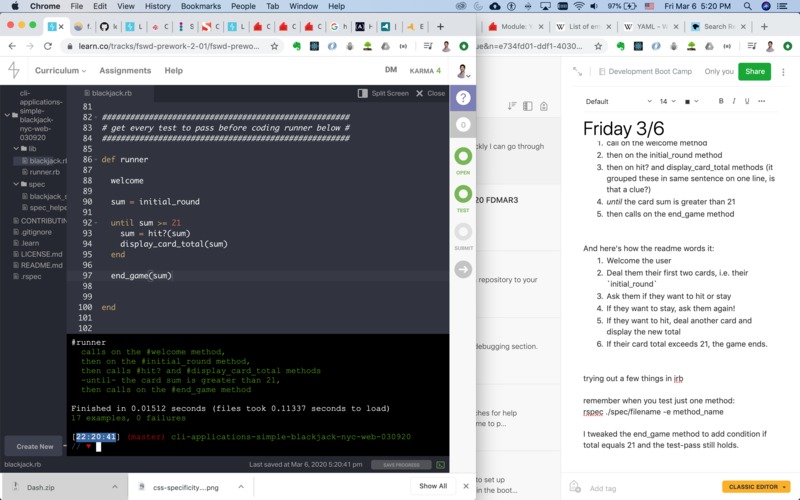
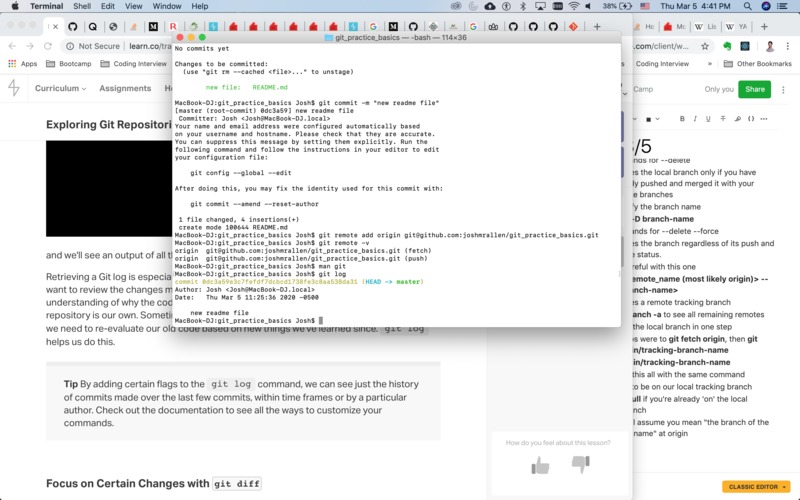
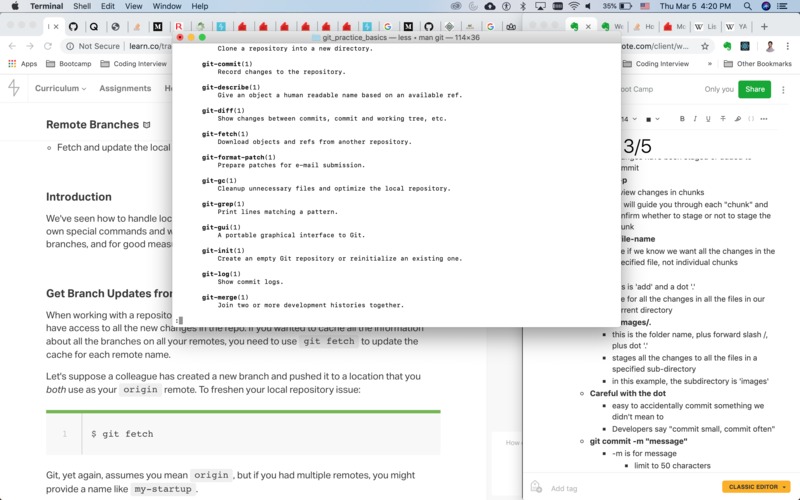
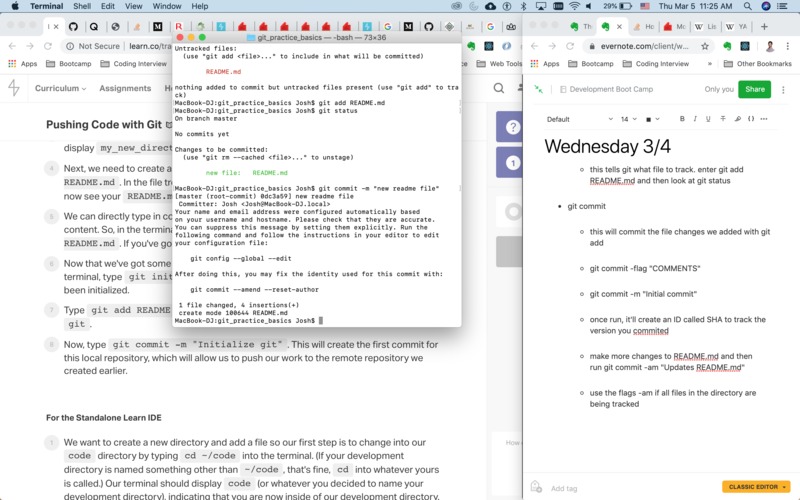
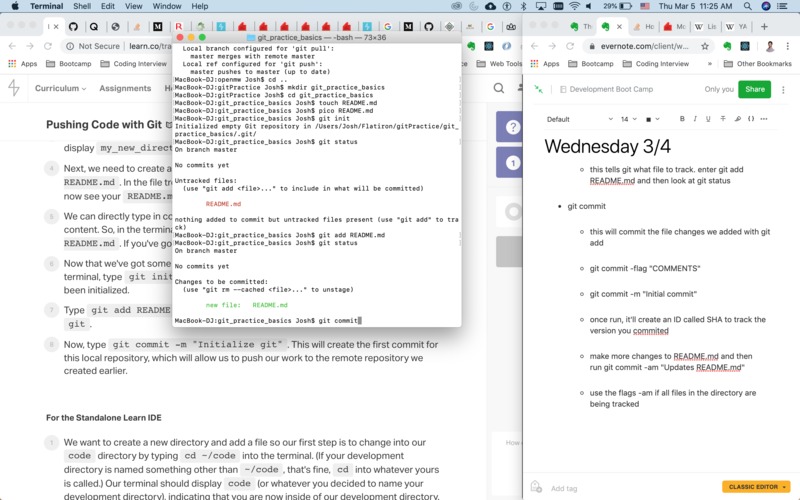
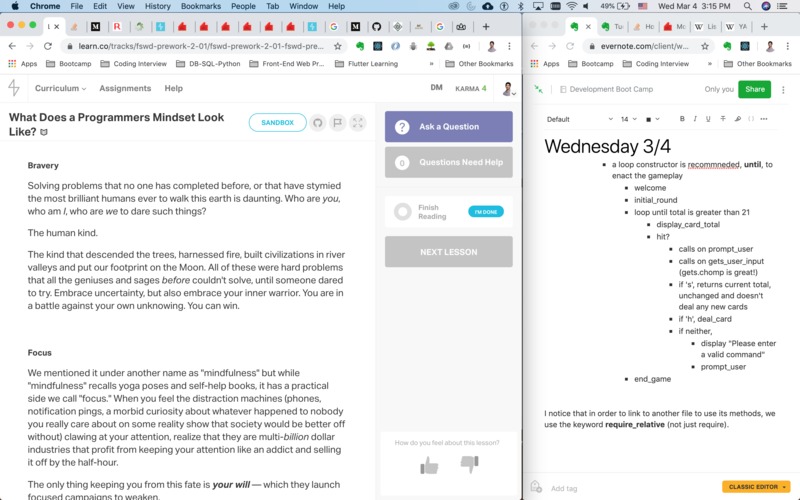
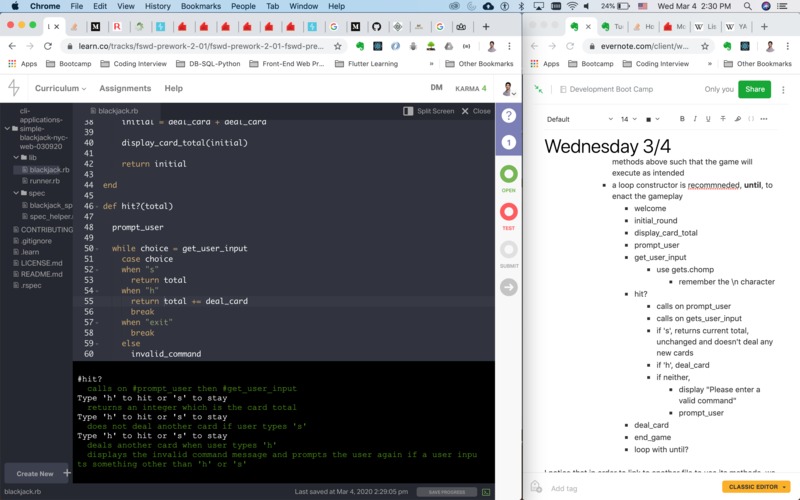
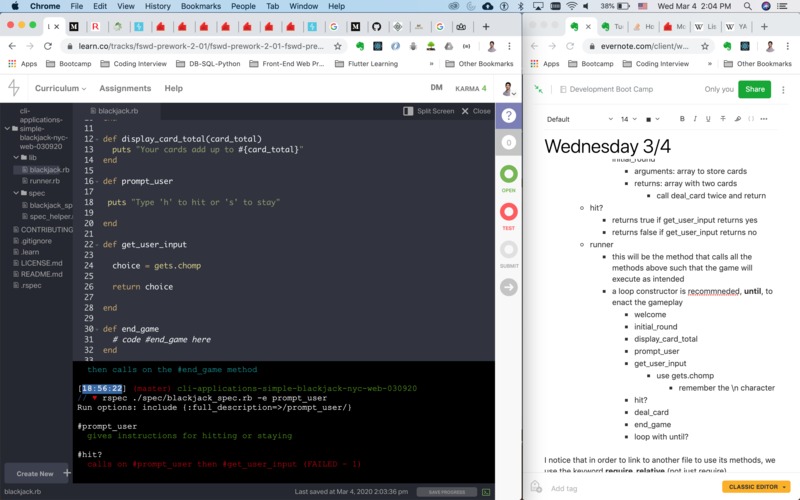
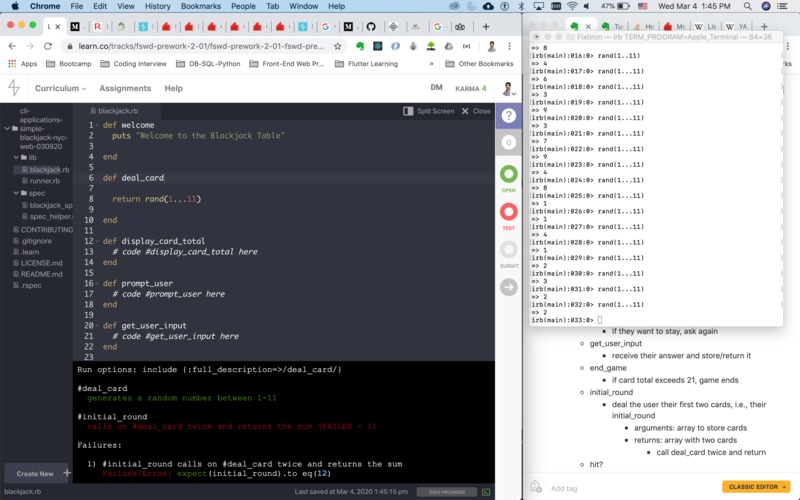
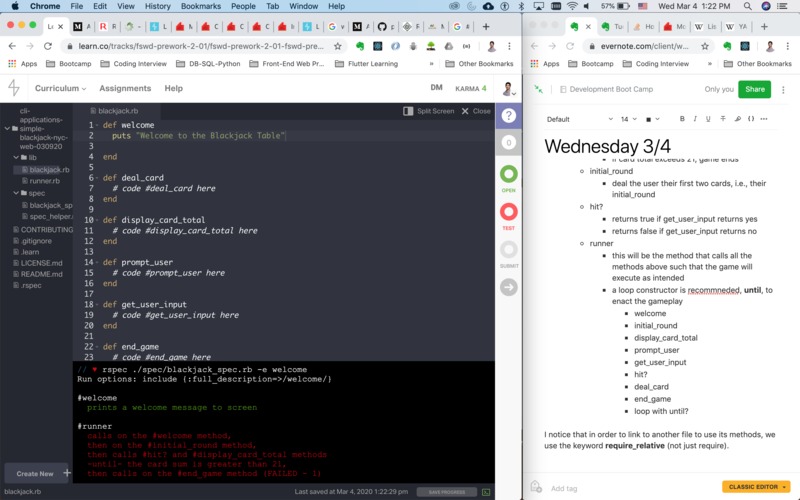
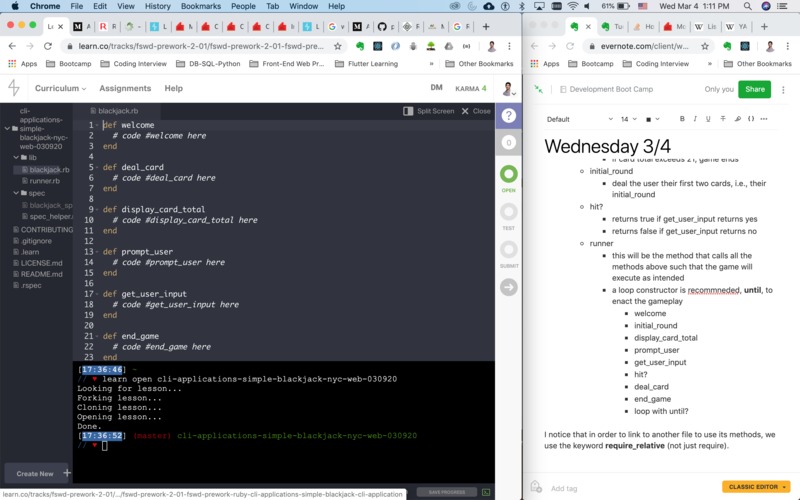
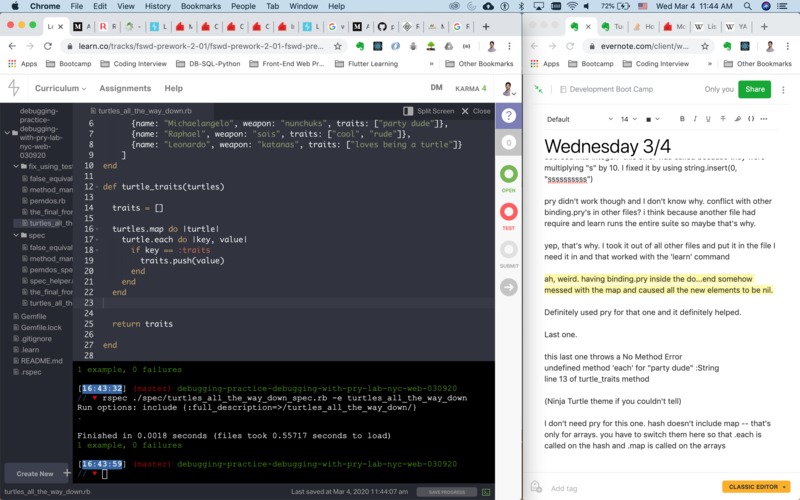
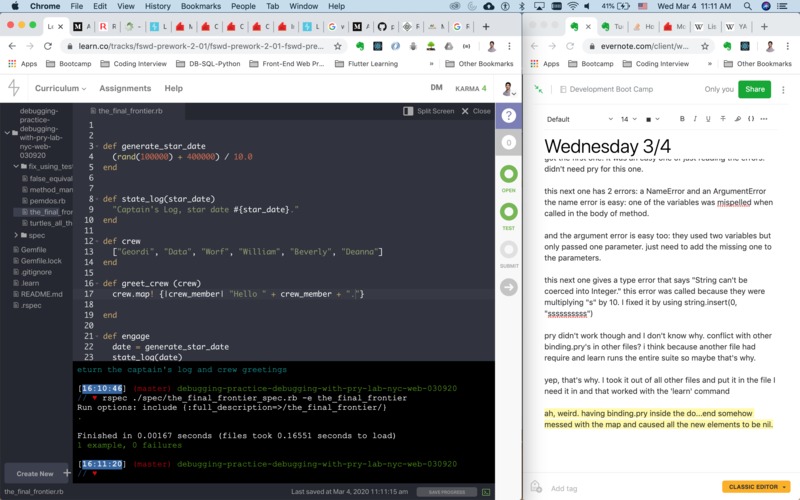
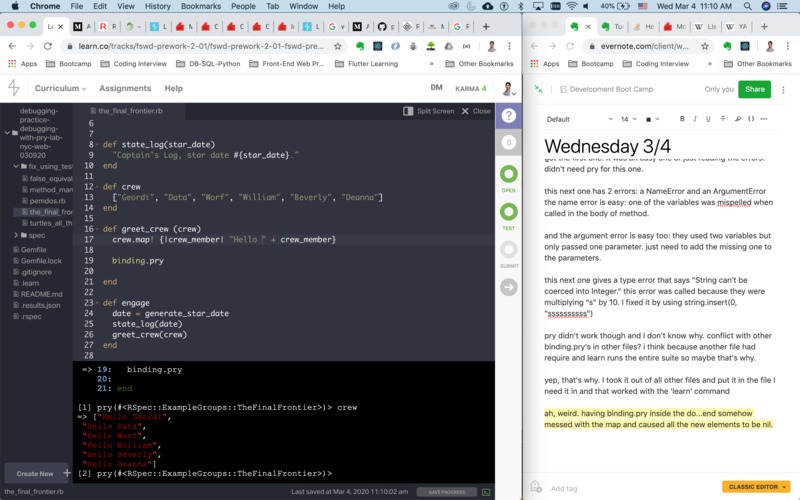
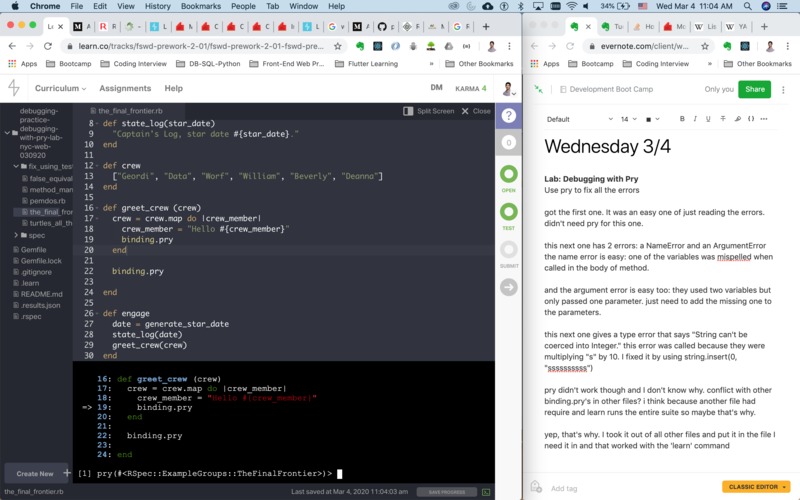
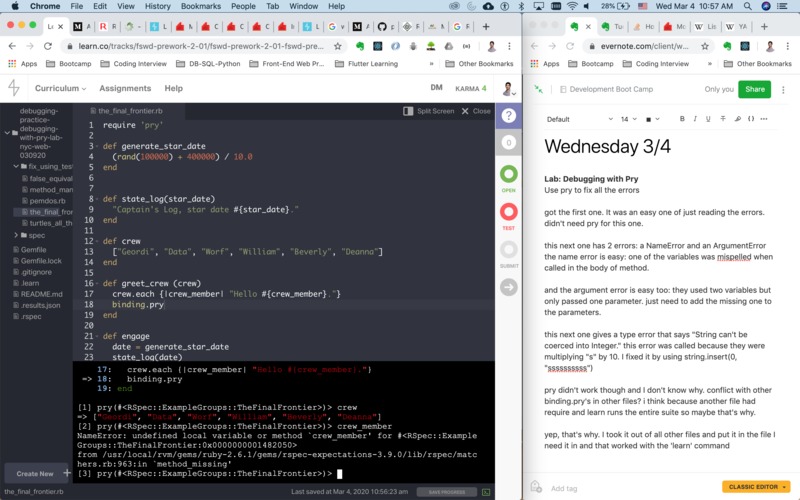
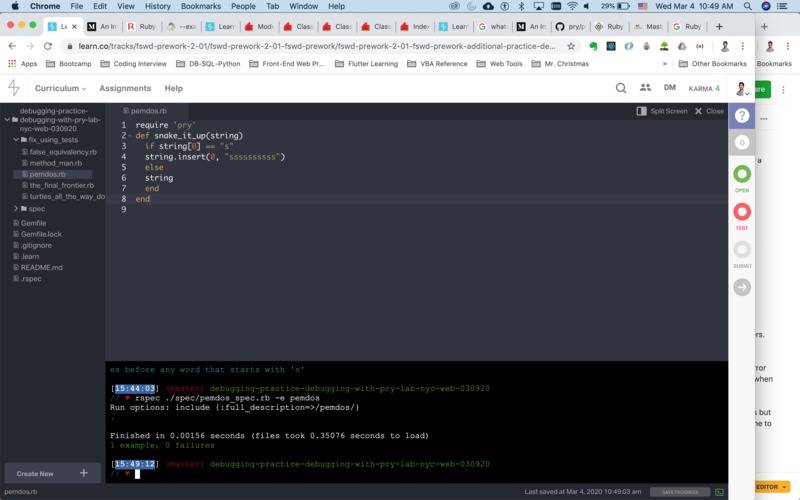
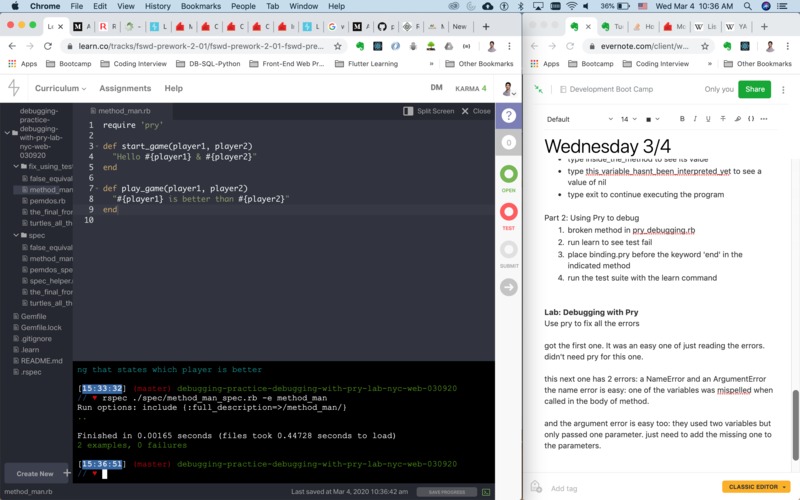
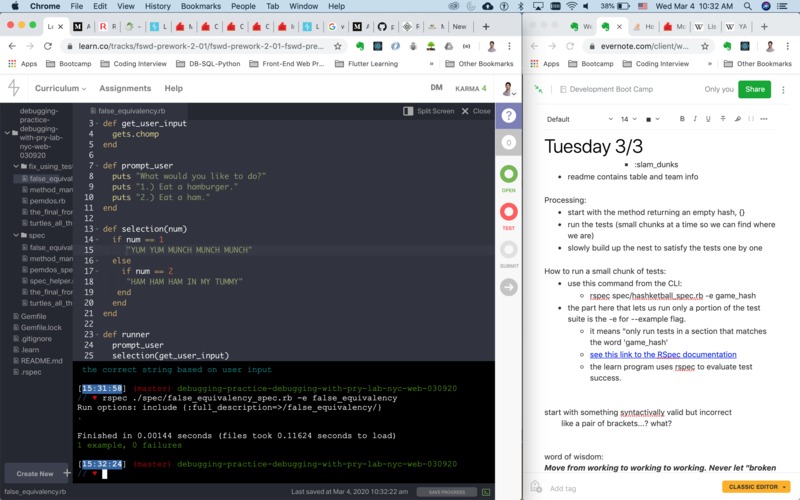
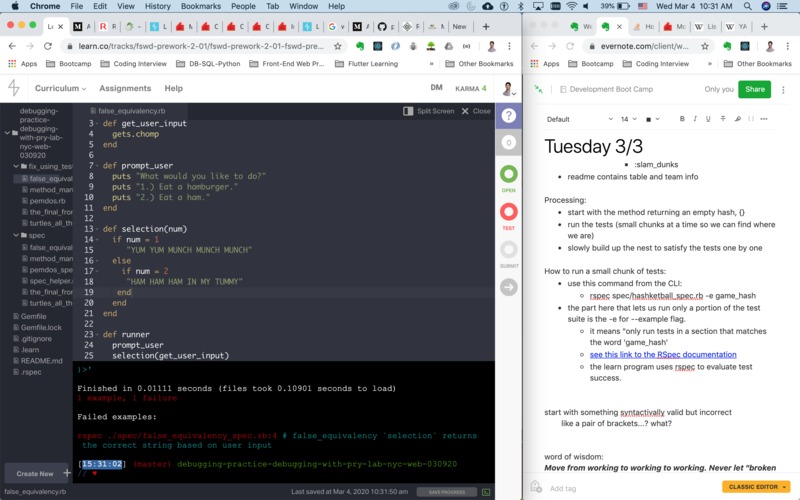
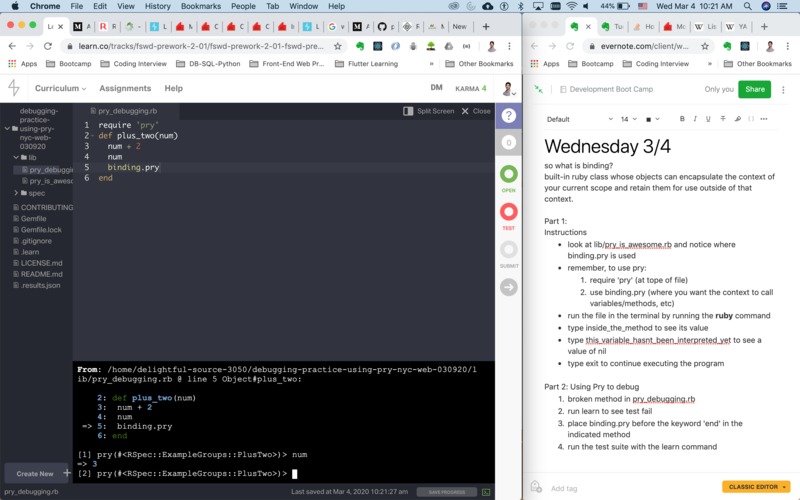
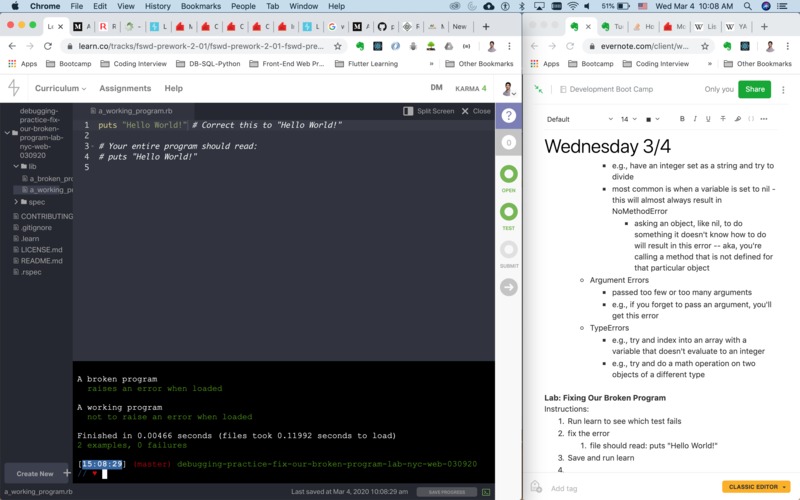
Notes/Report from Wednesday 3/4 Ok, let's get started on the debugging section. I'm pretty stuck on doing things in order -- I think it's a compulsive thing and I don't feel right doing it any other way, even though I know the best strategy would be to do all the labs first and then go back and read the text lessons. Anyways, starting with the Debugging section: Introduction to Debugging - Add'l Practice bug and debugging - attributed to Admiral Grace Hopper, 1940's. removed a moth that was stuck in a relay of a Mark II computer at Harvard University and said they were "debugging" the system. More on Pry this section. Debugging Errors in Ruby code 1. Always read error messages and understanding what they are referring to first before jumping back into code. Don't run away from them. 2. Helpful part of error messages: line number, file name, and type of error 3. Error Types * Name Errors * when ruby interpreter encounters a word it doesn't recognize, it assumes the word is the name of a variable or a method, but will throw an error if that word was never declared/defined as a variable or a method. * Syntax Errors * incorrect syntax * e.g., if you forget to put an 'end' for if statements, do..end statements, etc * No method Errors * e.g., have an integer set as a string and try to divide * most common is when a variable is set to nil - this will almost always result in NoMethodError * asking an object, like nil, to do something it doesn't know how to do will result in this error -- aka, you're calling a method that is not defined for that particular object * Argument Errors * passed too few or too many arguments * e.g., if you forget to pass an argument, you'll get this error * TypeErrors * e.g., try and index into an array with a variable that doesn't evaluate to an integer * e.g., try and do a math operation on two objects of a different type Lab: Fixing Our Broken Program Instructions: 1. Run learn to see which test fails 2. fix the error 1. file should read: puts "Hello World!" 3. Save and run learn basically a quick practice to read the error messages Lab: Debugging with Pry remember REPL: an interactive programming environment that stands for Read, Evaluate, Print, Loop that includes irb and pry this is where we answer the question about pry I've had in mind about binding because we use a line, binding.pry to pause the code so we can play with variables and methods locally. so what is binding? built-in ruby class whose objects can encapsulate the context of your current scope and retain them for use outside of that context. Part 1: Instructions * look at lib/pry_is_awesome.rb and notice where binding.pry is used * remember, to use pry: 1. require 'pry' (at tope of file) 2. use binding.pry (where you want the context to call variables/methods, etc) * run the file in the terminal by running the ruby command * type inside_the_method to see its value * type this_variable_hasnt_been_interpreted_yet to see a value of nil * type exit to continue executing the program Part 2: Using Pry to debug 1. broken method in pry_debugging.rb 2. run learn to see test fail 3. place binding.pry before the keyword 'end' in the indicated method 4. run the test suite with the learn command Lab: Debugging with Pry Use pry to fix all the errors got the first one. It was an easy one of just reading the errors. didn't need pry for this one. this next one has 2 errors: a NameError and an ArgumentError the name error is easy: one of the variables was mispelled when called in the body of method. and the argument error is easy too: they used two variables but only passed one parameter. just need to add the missing one to the parameters. this next one gives a type error that says "String can't be coerced into Integer." this error was called because they were multiplying "s" by 10. I fixed it by using string.insert(0, "ssssssssss") pry didn't work though and I don't know why. conflict with other binding.pry's in other files? i think because another file had require and learn runs the entire suite so maybe that's why. yep, that's why. I took it out of all other files and put it in the file I need it in and that worked with the 'learn' command ah, weird. having binding.pry inside the do...end somehow messed with the map and caused all the new elements to be nil. Definitely used pry for that one and it definitely helped. Last one. this last one throws a No Method Error undefined method 'each' for "party dude" :String line 13 of turtle_traits method (Ninja Turtle theme if you couldn't tell) I don't need pry for this one. hash doesn't include map -- that's only for arrays. you have to switch them here so that .each is called on the hash and .map is called on the arrays ok, pry helped a bit, but it didn't help me realize that one of the attributes in the hash was being read as a string and not as an array. I fixed the hash in the file and the test passed. all tests pass, yay! New section! Ruby CLI Applications first lesson: Simple Blackjack CLI Application goals: * utilize conditional logic and looping * gain an introduction to the command line interface Let's see how quickly I can go through these simplified blackjack: goal is to have a card total of or very close to but never exceeding 21. * player is dealt two cards, values are 1 through 11 * prompt for hit or stay * if hit * receive 1 new card * else if stay, nothing * if sum of all cards exceeds 21, player loses * if it doesn't, prompt again to hit or stay How do puts and print methods output text to your console? they use the $stdout global variable provided by Ruby puts and print send ouput to $stdout which sends the information a file called stdout on your computer which in turn communicates with your operating system which in turn outputs that info to the console. running this command line app: ruby <filename.rb> separation of concerns: have one file whose job is executing the program this lab uses runner.rb: ruby runner.rb Testing the command line app: user input is essential so in order to use rspec for our tests to work, we need the test suite to fake the implementation of the puts and gets methods. This is called stubbing stubbing: fake implementation of a method 1. expect($stdout).to receive(:puts).with("Type 'h' to hit or 's' to stay") 1. test suite is 'expecting' the method's execution to use puts method to output the string. 2. expect(self).to receive(:get_user_input).and_return("s") 1. test suite is 'expecting' this method get_user_input to use the gets method to store user input and return that very input 3. this command line appliacation will have one file for all the methods, including the final method called run_program 4. then we'll have a file whose sole purpose is to run the program -- it's called a runner file and it hase only one line: a call to the run_program method Instructions: 1. all code will go in blackjack.rb 2. once all tests pas, run this line: ruby lib/runner.rb to play 3. methods to define: * welcome * welcomes the user * deal_card * pass it an array * return an array with 1 element * each card is a random number between 1 and 11 * display_card_total * return their currently card total * prompt_user * ask them if they want to hit or stay * if they want to stay, ask again * get_user_input * receive their answer and store/return it * end_game * if card total exceeds 21, game ends * initial_round * deal the user their first two cards, i.e., their initial_round * arguments: array to store cards * returns: array with two cards * call deal_card twice and return * hit? * returns true if get_user_input returns yes * returns false if get_user_input returns no * runner * this will be the method that calls all the methods above such that the game will execute as intended * a loop constructor is recommneded, until, to enact the gameplay * welcome * initial_round * loop until total is greater than 21 * display_card_total * hit? * calls on prompt_user * calls on gets_user_input (gets.chomp is great!) * if 's', returns current total, unchanged and doesn't deal any new cards * if 'h', deal_card * if neither, * display "Please enter a valid command" * prompt_user * end_game I notice that in order to link to another file to use its methods, we use the keyword require_relative (not just require). So I got all the tests to pass, but something isn't working. I'm reading ahead as a break and will come back to this later. I like this image here about the programming process: Ooh, something noteworthy here: state table: table that keeps track of the inputs,outputs, local variables, and conditions in a bounded or fenced-off 'bloc' of code or pseudocode. Because the blocs are fenced off, sometimes we have to provide input that would be available if the bloc were part of a larger program. It's okay to do this because we'll assume that other code does its job properly. Variable State State State State State State State State State Input: baguette Input: n Output: even_pieces Local: baguette_length Local: even_length Local: collection Cond: baguette_length > even_length Local: piece Local: rest State will be the value of each variable at each point in the program's execution Triangle process of debugging verify the inputs, outputs, and implementation of individual code blocs (a procedure, a function, a method, etc) "white boarding" is when you use a white board to write down your pseudocode or work through your "pseudocoding" "the ability to craft focused pseudocode that solves problems is the essential focus of the "whiteboard" interview used in engineering teams. The ability to demonstrate, with state tables, that your pseudocode works is a strong signal to other developers of your ability to think clearly about programming. The final step (and, to be honest, it's also expected in whiteboard interviews) is to take these ideas and turn them into code in a particular language." https://qz.com/1365059/a-universal-way-to-solve-problems-from-a-mathematical-genius/ Took a quiz and learned a lot. Next Section: Version Control version control system: VCS for short software that controls collections of versions most popular is "Git" popular VCS's: Git, Mercurial, Subversion, and others VCS's allow us to experiment without fear and try new and improved techniques article that uses oil paint as historical example of version control and how it unlocks freedom and creativity: article: http://www.paulgraham.com/hp.html Other benefits: * automatically create a backup of your work * provide an easy way to undo mistakes and restore previous versions easily * document changes and log comments as to why, etc * keep file names and hierarchies consistent and organized * branch work off into multiple "sandboxes" that can be experimented with but won't impact each other * collaborate with others without disturbing each other's or our own work Git vocabulary terms * repository (repo for short) - directory of files tracked by Git * track - Git will track a file and notice any difference aka changes aka diff's -- then gives you choice to add the change in order to keep it * diff - short for difference. diff for file is changes since the last commit; diff for repo is all the diffs in all the tracked files inside the repo that have been made but have not yet been committed (sometimes called the 'diffset') * commit - command to save the diff. when commit is made, we're asked to write a "log" message describing what happened in the diff * log - the record of what happened in each commit * local/remote - when we start working with a git repo, we "clone" it from a remote source and have a copy of that directory on our own system. we call the repo on our personal system, the local repo. * master branch - multiple branches are basically the sandboxes where we can experiment and change code without worrying about destroying anything -- for the moment, for me, whenever I create a Git repo, I'll be working on the master branch * branch - the combined history fo all the changes of all the files in the repo Conclusion: version control helps us maintain the overall stability of our code so that we can feel free to explore. Next Section: Git Basics commands: * git init * mkdir git_project_name * cd git_project * git init * make sure to only type this command in the directory you want git to track * git status * run it in the git directory * tells information about the directory * tell information about number of commits, etc * touch README.md and run git status to see what it looks like * git add * git add <filename or path> * preserves changes you make to a file * this tells git what file to track. enter git add README.md and then look at git status * git commit * this will commit the file changes we added with git add * git commit -flag "COMMENTS" * git commit -m "Initial commit" * once run, it'll create an ID called SHA to track the version you commited * make more changes to README.md and then run git commit -am "Updates README.md" * use the flags -am if all files in the directory are being tracked |
|
|
|
|


.